Getting started with Windows Imaging & Glazier (Part 1)
What is Glazier?
From https://github.com/google/glazier#glazier and https://github.com/google/glazier#why-glazier:
Glazier is a tool developed at Google for automating Windows operating system deployments.
Glazier was created with the following 3 core principles in mind: Text-Based & Code-Driven, Scalability, and Extensibility.
Sounds awesome. How do I get started?
The Glazier readme suggests:
See our [Glazier’s] docs site for how you can get started with Glazier.
However, The setup overview comes “without the batteries included”. The authors expect that you already know how to create WIMs, use the dism CLI tool, and some other common WinAdmin tasks. These expectations are completely fair.
However:
- I am not a WinAdmin by trade.
- I was worried that even if I set up Glazier by hand successfully, I’d never remember the exact steps required to do it again.
Thus, I worked hard to streamline and automate the setup details and share a reproducible way to create a WinPE ISO that supports Glazier. I hope you find the results useful :)
Set up Glazier
Create a WinPE “factory”
Set up a Windows 10 virtual machine. It can be on any platform: AWS, GCP, VMWare (ESXI or Fusion), etc. We’ll use this VM later to create a WinPE ISO.
Clone my
glazier-starter-kitrepository.git clone https://github.com/discentem/glazier-starter-kit.gitThis repository contains 3 main things:
- a powershell script that automatically generates a WinPE ISO with Glazier and all of its dependencies 🎉
- a complete example set of Glazier config files
- a golang script that can sync Glazier config files to s3
I will discuss these things in more detail later on. For now, let’s move on to drivers.
Gather drivers from your device fleet
As per Glazier’s boot media requirements, we need to make sure our WinPE image includes any drivers required to enable the local NIC/Video/Storage on the device. Network connectivity during WinPE is necessary to reach the distribution point.
In order to achieve this, you’ll need to do the following steps on each device model that you want your Windows 10 image to support. One of the laptop models in my fleet is the Dell XPS 13 9370, so I’ll be doing these steps on that.
Grab a laptop from your fleet. Make sure Windows 10 is up-to-date on this device and that all the latest drivers are installed. I am working with a Dell machine, so I used Dell Command Update to update all of the drivers.
On the laptop, export all of this device’s drivers with Export-WindowsDriver. You will need to launch Powershell as an Administrator.
Export-Windowsdriver -Online -Destination c:\driversDuring the execution of this command, you’ll see output like this. This is only a partial snippet of the output.
...
Driver           : oem25.inf
OriginalFileName : C:\Windows\System32\DriverStore\FileRepository\killernetworkextension.inf
                   _amd64_635597853a943a8a\killernetworkextension.inf
Inbox            : False
ClassName        : Extension
BootCritical     : False
ProviderName     : Rivet Networks LLC
Date             : 4/16/2020 12:00:00 AM
Version          : 2.2.3267.0
...
...
Driver           : oem28.inf
OriginalFileName : C:\Windows\System32\DriverStore\FileRepository\killernetworkcomponent.inf
                   _amd64_2caa3873bf7cf75d\killernetworkcomponent.inf
Inbox            : False
ClassName        : SoftwareComponent
BootCritical     : False
ProviderName     : Rivet Networks LLC
Date             : 4/16/2020 12:00:00 AM
Version          : 2.2.3267.0
Copy the entire contents of
C:\driverson the laptop toC:\drivers\dell\xps\9370on your Windows 10 virtual machine.Recall that we technically only need drivers related to NIC, Video, or Storage for WinPE. However, because I’m lazy, I’ll just copy all of the drivers.
After copying
C:\driversback to the virtual machine, the directory should look something like this, with each subfolder containing the files for an individual driver: (partial snippet)PS C:\Users\brandon> ls C:\drivers\dell\xps\9370 Directory: C:\drivers\dell\xps\9370 Mode LastWriteTime Length Name ---- ------------- ------ ---- d----- 6/19/2021 5:01 PM atheros_bth.inf_amd64_059e038b6e018050 d----- 6/19/2021 5:01 PM cui_dch.inf_amd64_b8e01d9e8716d2a7 d----- 6/19/2021 5:01 PM detectionverificationdrv.inf_amd64_dcc202b5af4a34b5 ...Repeat the above steps 1-3 above on each device model that you want to support, keeping a separate folder for each model. Reference the total control method for driver management for more information.
Setting up Glazier distribution point
Set up a web server
Per https://github.com/google/glazier/tree/master/docs/setup#distribution-point, we need to set up a web server to host our Glazier config files. I’m going to use Amazon S3 but you can use any web server that supports https. A few important notes:
- By default, Glazier does not provide web authentication for downloading resources. So your web server needs to be open to the internet, behind a network ACL, or some other form of device-based authentication.
- Fresnel, another open-source project from Google’s WinOps team, can provide authenticated downloads for Glazier. However, Fresnel is out-of-scope for this post.
If you aren’t using s3: set up your own web service and skip to Get familiar with Glazier.
Set up S3
Create an S3 bucket. You can do this via the AWS Console, via Terraform’s AWS provider, or another tool of your choice. For more information see https://docs.aws.amazon.com/AmazonS3/latest/userguide/creating-bucket.html.
Turn off the
Block Public Accesssettings.The AWS console (screenshot below) will show you persistent warnings that you should not set “Block Public Acccess” to “Off” because it is generally not recommended for any service hosted on s3. However, we need to do this for Glazier because we do not have Fresnel set up.
Disclaimer: If you set up Glazier for production, you should probably turn
Block Public Accesson again and set up Fresnel or another authentication mechanism.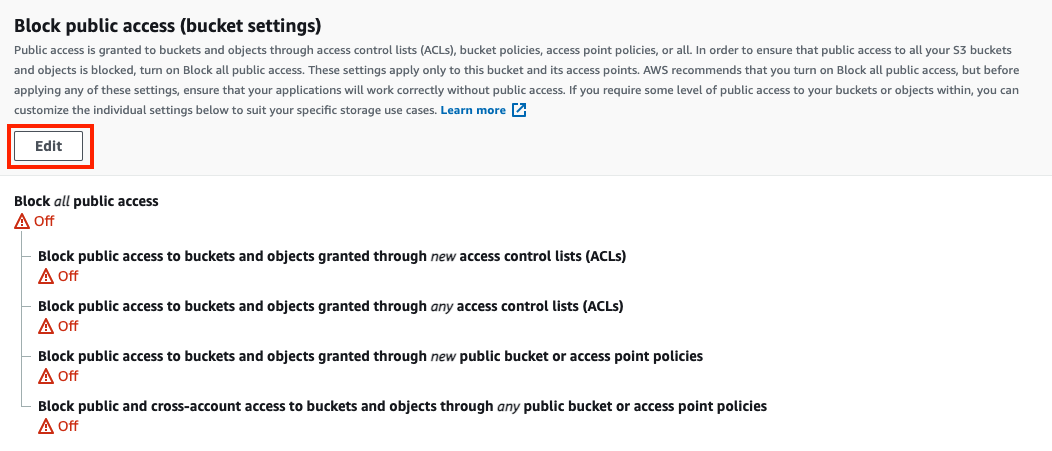
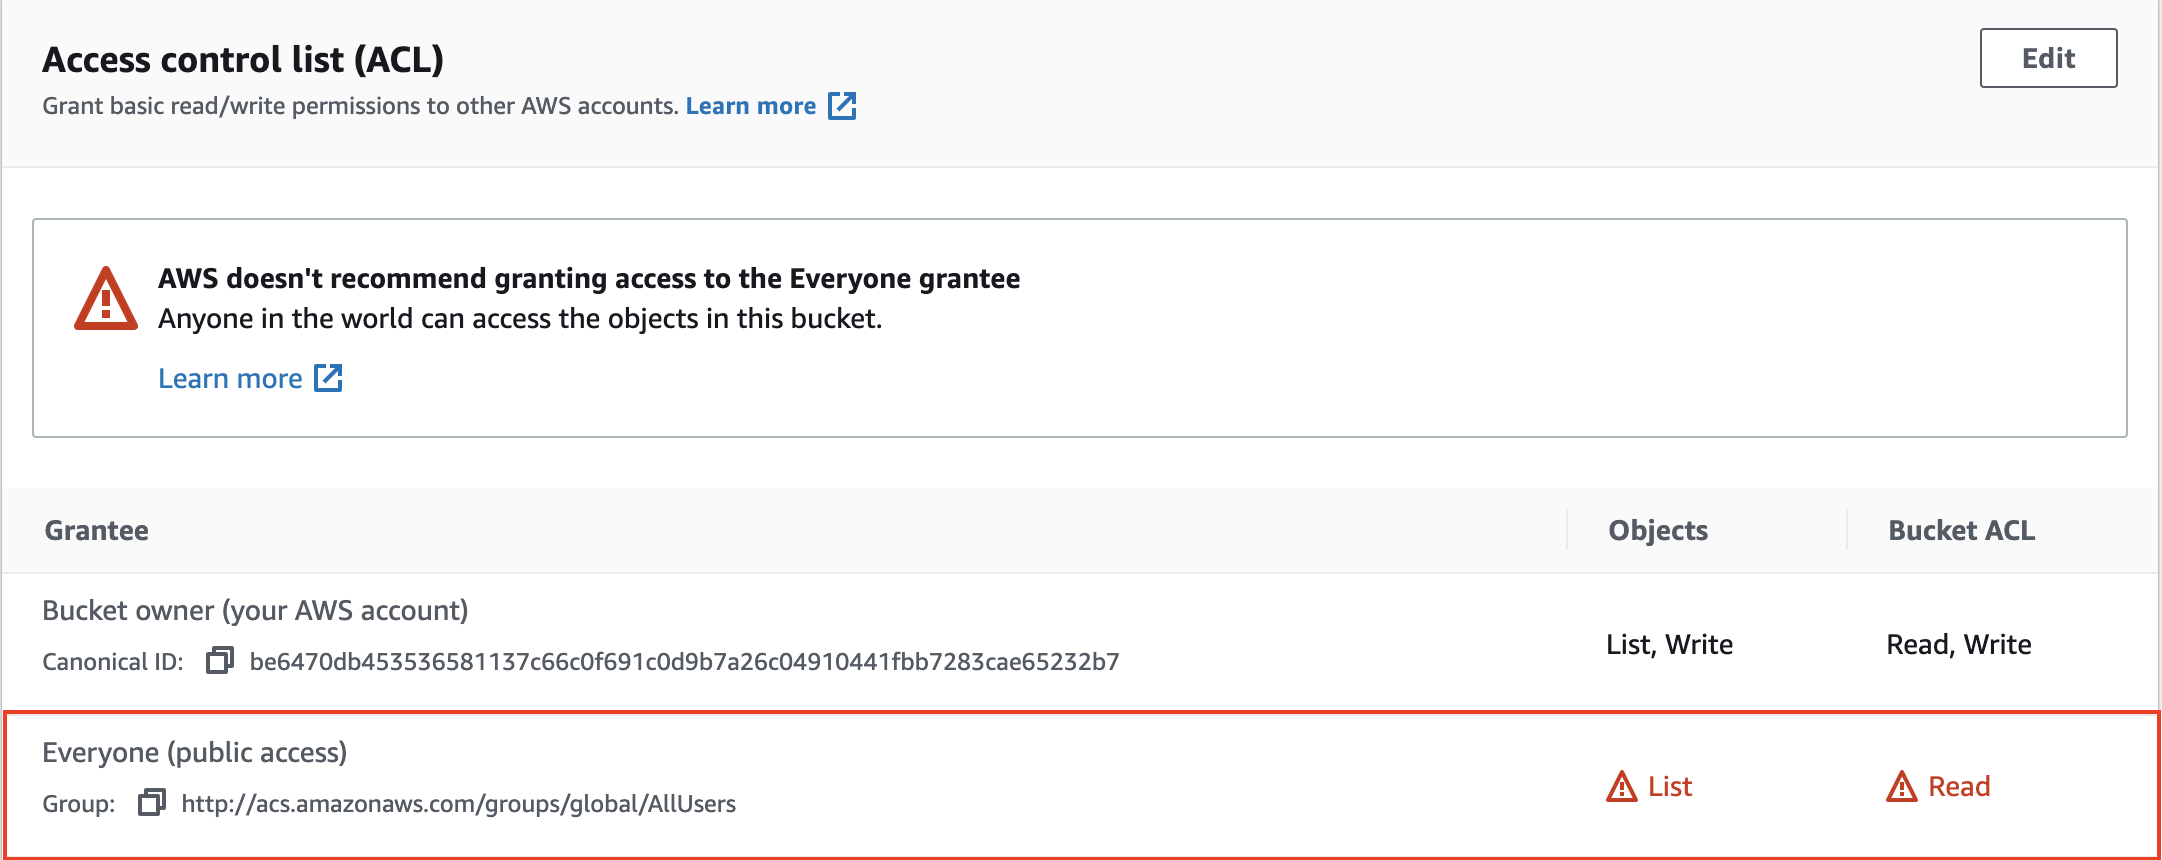
Grant
Everyone (public)read and list permissions on the s3 bucket.Disclaimer: If you set up Glazier for production, you should probably not do this. Instead, set up Fresnel or consult with a Security Engineer to design some authentication mechanism.
Get familiar with Glazier
Take a few minutes to read over the following resources. These docs will help you become familiar the layout and syntax of Glazier configuration files so that you can customize Glazier for your environment.
- https://google.github.io/glazier/setup/config_layout. This page goes into great detail about the layout of a Glazier distribution point and Glazier config files.
- https://github.com/google/glazier/tree/master/examples has a few good examples of
build.yamlfiles which show off some of the actions Glazier is capable of. - https://github.com/google/glazier/blob/master/docs/actions.md#actions. This page describes all of the existing Glazier actions (aka functions). You can also create your own actions.
If desired, fork
glazier-starter-kit/glazier-repoand/or customize as necessary.- You don’t necessarily need to customize anything at first.
glazier-starter-kit/glazier-repocontains a complete set of config files. These basic configs won’t accomplish very much but they will enough for a Glazier proof-of-concept.
- You don’t necessarily need to customize anything at first.
Upload Glazier configs
Upload the contents of
glazier-starter-kit/glazier-repo, with any additions/modifications you’ve made, to your web server. The root of your web server should look something like this:% ls -1 dev stable version-info.yaml[<--- Expand here] If you are using Amazon S3 as a distribution point, you can use a Go binary I wrote to upload Glazier configs to your Glazier distribution point.
Use my main.go script:
- Set up an IAM user for S3 uploads. See https://docs.easydigitaldownloads.com/article/1455-amazon-s3-creating-an-iam-user.
- Set up the required environment variables.
- Install go.
- Run
go run main.go sync from withinglazier-starter-kit/tools/ .
Make note of web server’s url. If you are using s3, it will be in the form of https://yourbucketname.s3.amazonaws.com/.
Create the WinPE ISO and USB
Back on your virtual machine
Launch Powershell as an Administrator again and start a new session with an execution policy of bypass.
powershell.exe -ExecutionPolicy BypassRun the
bootstrap_winpe.ps1script. Note, the script may be in a different location on your machine, depending on where you clonedglazier-starter-kit.C:\glazier-starter-kit\tools\bootstrap_winpe.ps1 --config_server https://YOUR_WEBSERVER_OR_BUCKETNAME_URL_GOES_HEREAfter a few minutes you should see the output end like this.
Done.
NoPromptIso: C:\OSDCloud\OSDCloud_NoPrompt.ISO
=========================================================================
2021-06-27-142237 New-OSDCloud.ISO Completed in 00 minutes 10 seconds
OSDCloud ISO created at C:\OSDCloud\OSDCloud.ISO
=========================================================================
For a full breakdown of what this script does, check out the code comments at https://github.com/discentem/glazier-starter-kit/blob/master/tools/bootstrap_winpe.ps1. In summary bootstrap_winpe.ps1:
- Installs the Chocolatey package manager
- Installs Windows ADK and the WinPE components with Chocolatey
- Installs and imports the OSDeploy powershell module
- Creates a OSDCloud template and a OSDCloud workspace
- Downloads Python
- Installs your drivers into the wim
- Mounts a
boot.wim(expands the WinPE filesystem on disk) - Installs Python (in the wim)
- Installs git (with chocolatey)
- Clones Glazier into the mounted wim and runs git pull
- Installs Glazier’s python requirements
- Writes a custom
startnet.cmdwhich will prompt for Wifi and auto start Glazier upon booting the wim - Generates an ISO with all of the above
It is safe to run the script multiple times. Some steps are idempotent. Others are repeated unnecessarily but will result in the correct ISO.
Use your favorite tool to create a bootable usb of
C:\OSDCloud\OSDCloud_NoPrompt.ISO. I’ve been using New-OSDCloud.usb but theoretically UNetBootin, Rufus, or another similiar tool will work just fine.
Start “Imaging”
Boot one of the machines in your fleet from your newly created usb.
Upon booting the usb, if you aren’t connected to ethernet, you’ll be prompted to select a Wifi network.
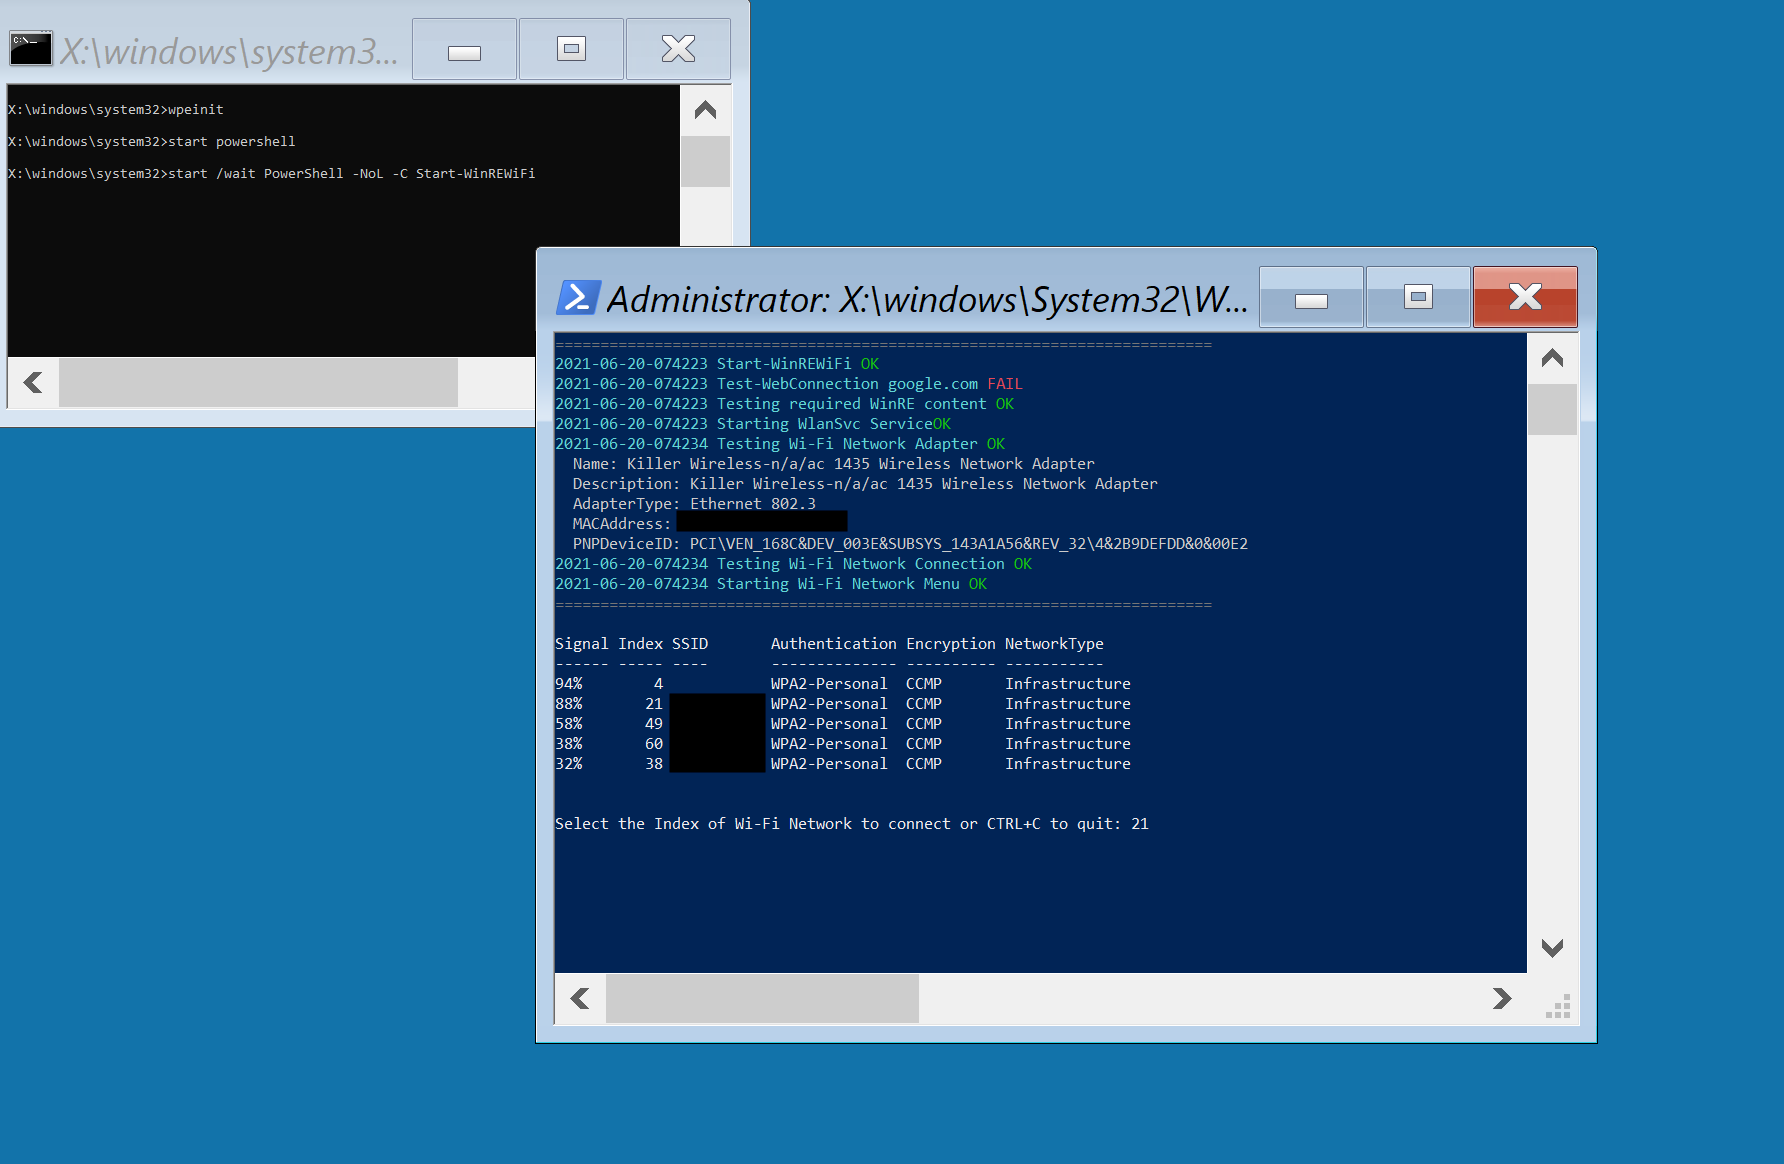
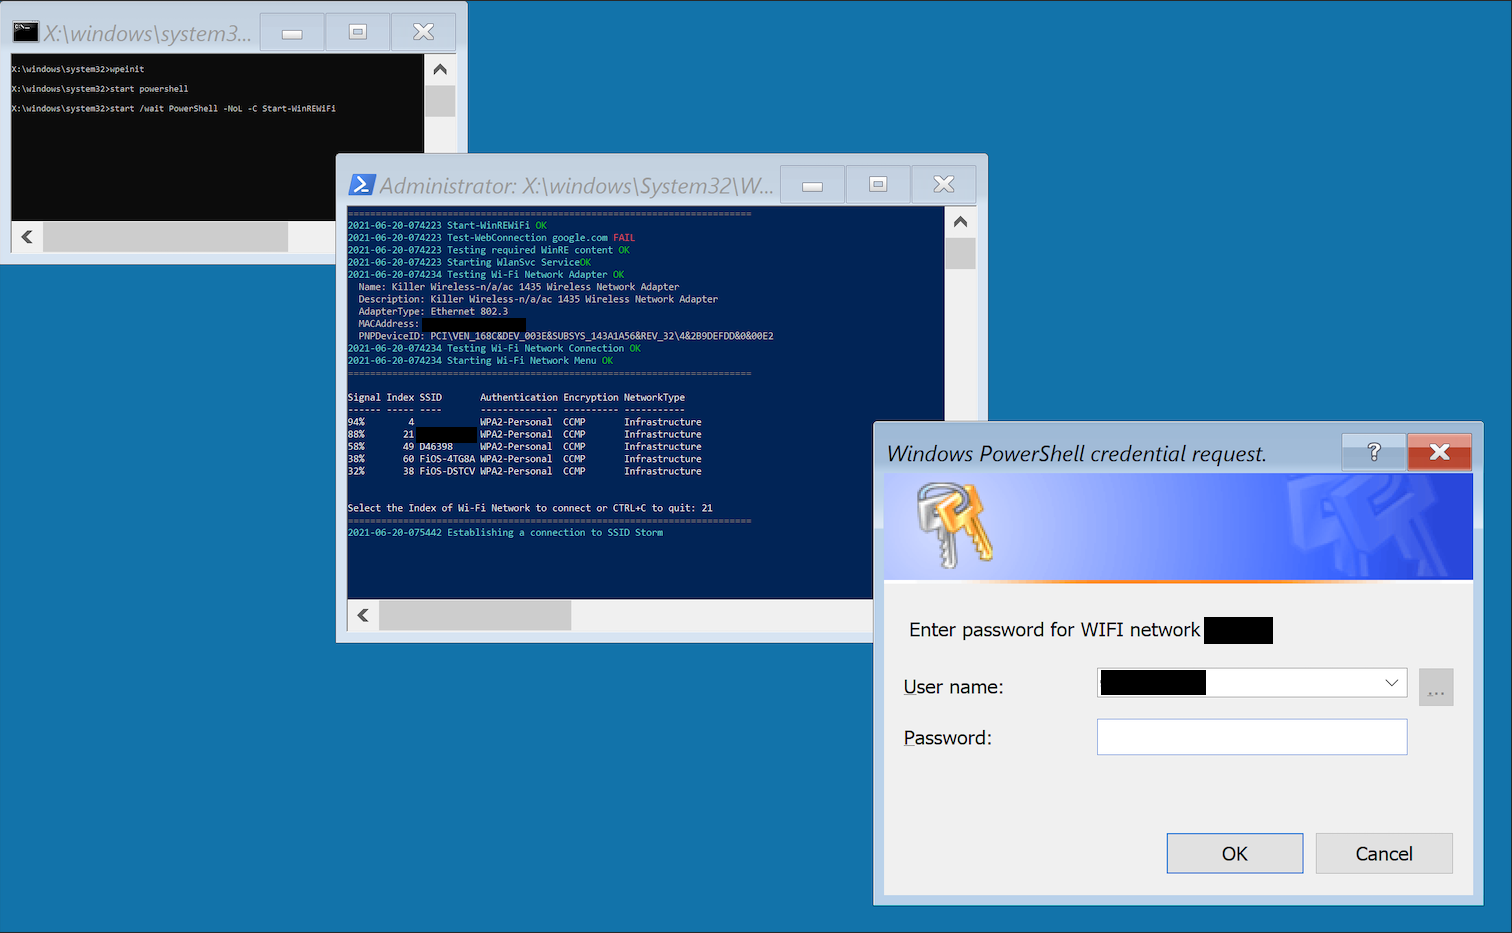
After getting connected to the internet,
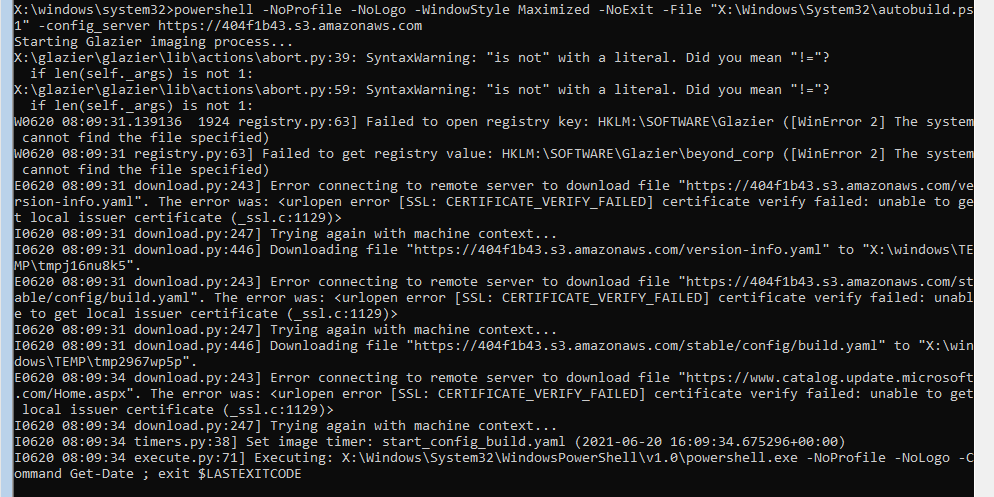
autobuild.ps1will run. This is heavily borrowed from @tseknet’s example autobuild.ps1. Thanks again for sharing that!X:\windows\system32>powershell -NoProfile -NoLogo -WindowStyle Maximized -NoExit -File "X:\Windows\System32\autobuild.ps1" -config_server https://YOUR_WEBSERVER_OR_BUCKETNAME_URL_HEREIf you are using Glazier with my original config files, next you’ll see this screen.
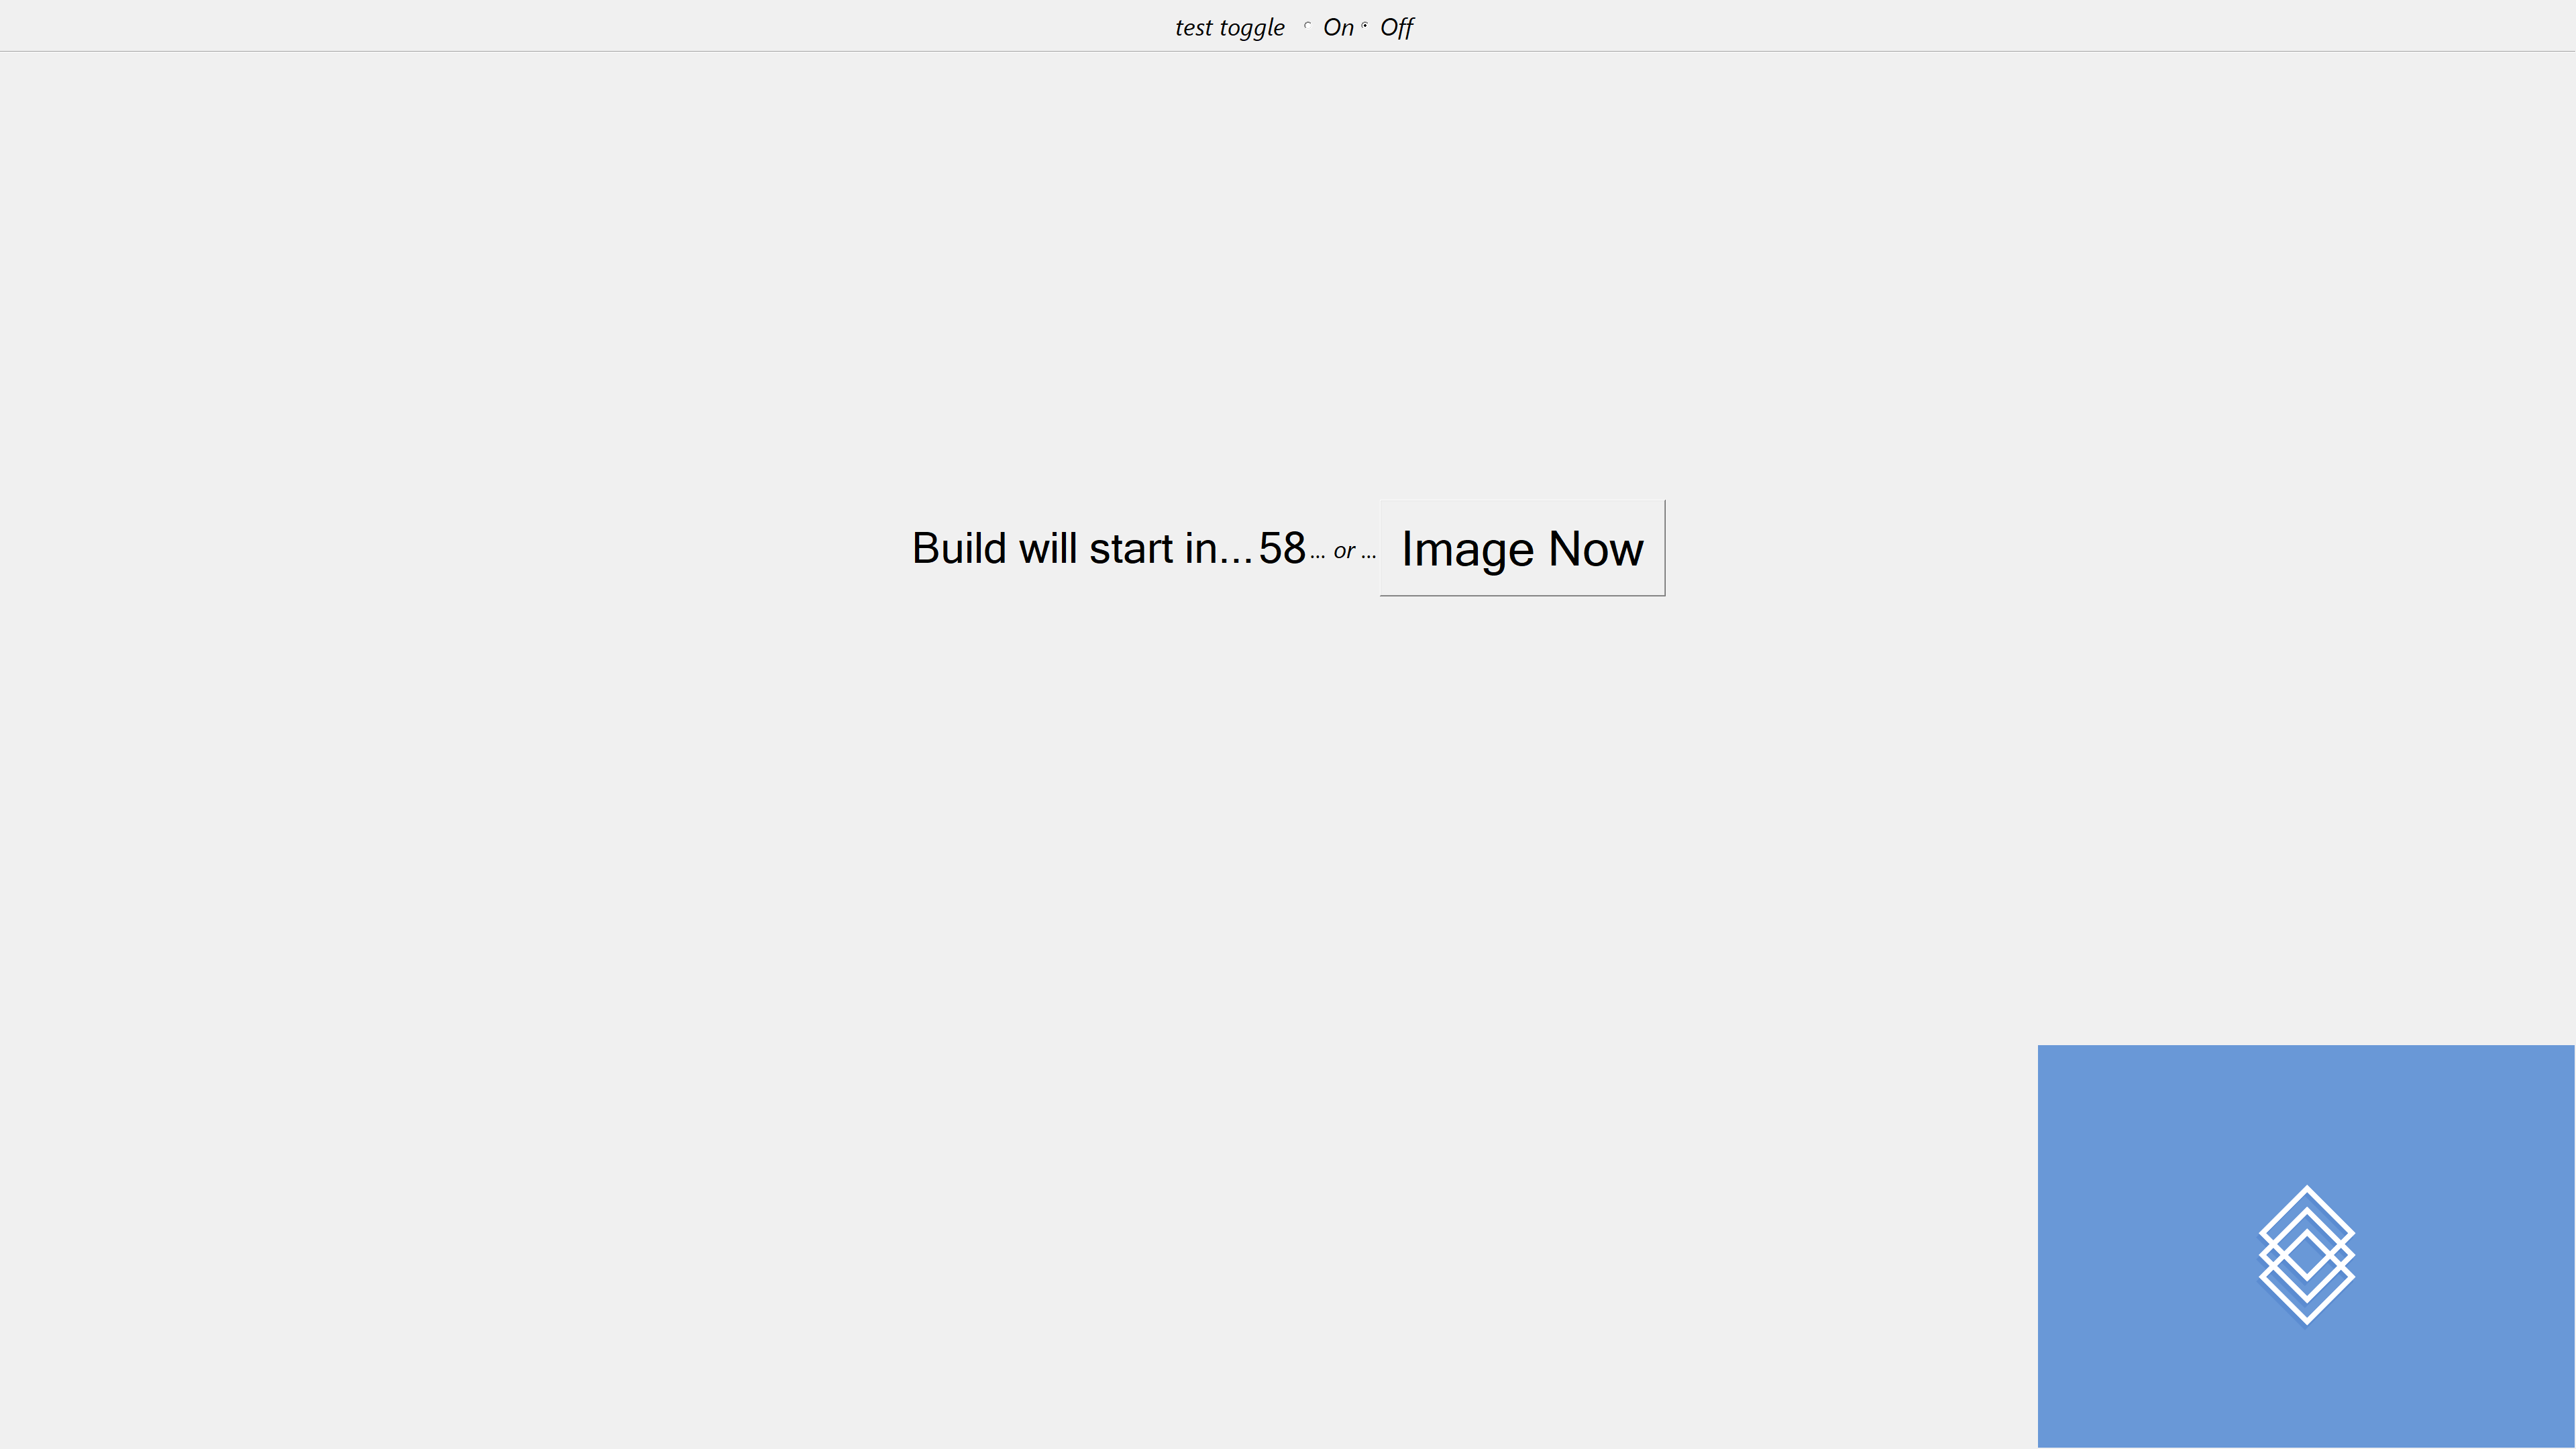
You see this because I configured it in this build.yaml file. See https://google.github.io/glazier/yaml/chooser_ui for more info.
- pin: ''
  choice:
     name: test_thing
     type: toggle
     prompt: "test toggle"
     options: [
        {label: 'False', value: False, tip: ''},
        {label: 'True', value: True, tip: ''},
     ]
- pin: ''
  ShowChooser: []
The logo is copied from https://github.com/discentem/glazier-starter-kit/blob/master/glazier-resources/logo.gif to the WIM: https://github.com/discentem/glazier-starter-kit/blob/master/tools/bootstrap_winpe.ps1#L132.
Glazier expects the logo to be in the resources directory: https://github.com/google/glazier/blob/master/glazier/chooser/chooser.py#L98.
After clicking “Image now” or waiting 60 seconds, Glazier will run the powershell commands I configured it to run.
Yay! We did it! Wait. What did we do exactly?
We set up Glazier in a repeatable fashion and configured it to do some basic stuff. It was a proof-of-concept, but we can do much more! See https://google.github.io/glazier/actions for all the things Glazier can do.
Potential next steps for you or for a follow-up blog post
We should actually partition the computer we were “imaging”.
- Problem: You might have noticed we didn’t really “image” anything. We just told Glazier to give us the date and exit 🥲.
- Solution: Write a powershell script that actually partitions the drive and expands a vanilla Windows 10 wim onto the drive. Something like this from OSDCloud.
Webservers that are open to the internet are bad.
- Problem: Glazier does not provide an authentication method for clients out-of-the-box. It is not secure by default.
- Solution: Spin up Google’s Fresnel project
- Stretch solution: Write equivalent of Fresnel that can be hosted somewhere other than AppEngine.
We should automate some “post-imaging” tasks once booted into the host OS.
- Problem: Even if we solve partitioning the drive and install vanilla Windows 10, we still haven’t done anything novel or special. We should also install some packages such as a configuration management tool (Puppet or Saltstack) and a package manager (Chocolatey, Googet, or Gorilla).
- Solution: Add some Glazier config to automatically log in after the host OS is installed and do stuff. See https://github.com/google/glazier/blob/master/docs/setup/README.md#images--sysprep for some ideas.
We could write some new Glazier actions in go or reimagine the entire tool
Problem: Setting up Python in WinPE is a giant pain. If it were a single go binary, setup work be easier. It seems like the folks at Google have the same idea. But none of the Glazier actions currently use this code (yet).
Possible Solutions:
- Write some Glazier actions that call the above Go code
- A somewhat out-there idea: Write a completely new imaging tool that uses starlark instead of yaml with https://github.com/google/starlark-go.
Have a question, clarification, or comment?
File an issue or PR (pull request) against my blog at https://github.com/discentem/blog-content. If you want to make a PR against this specific post, you’ll find the source for this post here.
Credits
- Thank you to Google WinOps for writing Glazier. This tool has really captured my imagination.
- Thank you @contains_eng for inspiring me to write something to help people set up Glazier. Sorry it’s a few years late :P
- Thank you @tseknet for always answering my questions and always jumping at the chance to improve Glazier’s docs. You rock! I miss working with you buddy.
- Thank you @seguraosd for writing the awesome OSDCloud tool.
- Thank you @editingemily for talking openly at your MacDevOpsYVR keynote about your struggle/journey to write a book. The scale of this blog post is nothing compared to a book, but you still inspired me to keep pushing through when I was struggling.
- Thank you @groob for introducing to me to starlark-go. I haven’t used it for any production tools yet but I keep trying to find a use case :)